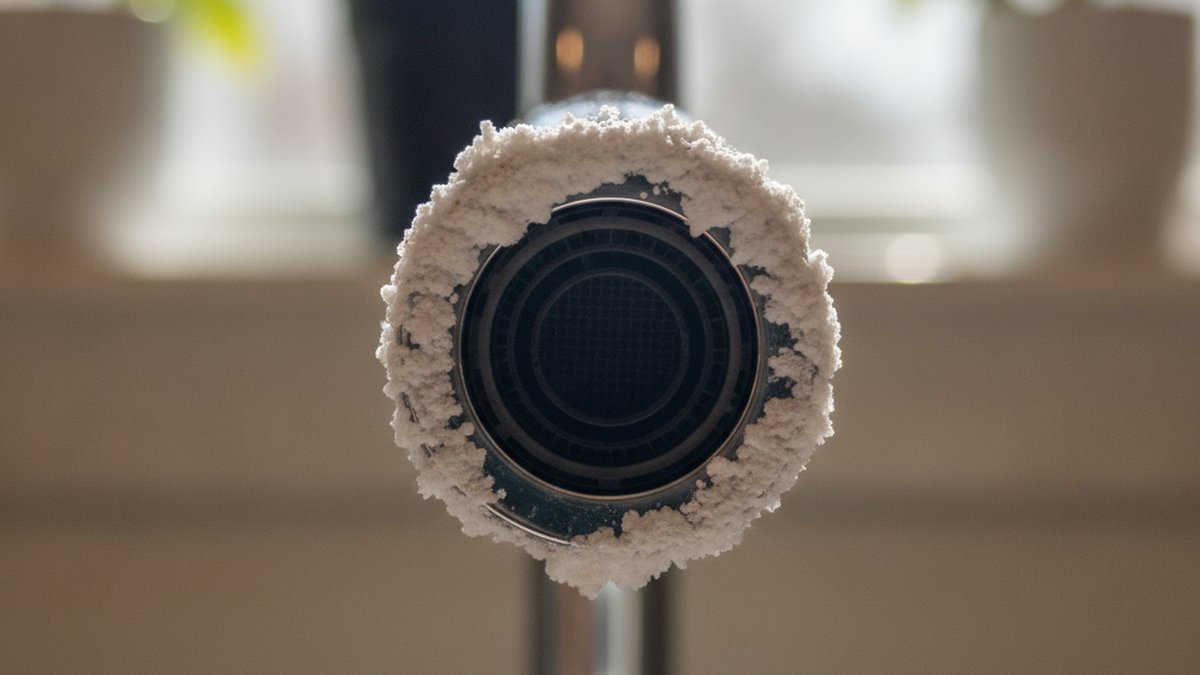
If you’re wondering how to remove a Moen kitchen faucet aerator, the short version is this: it almost always unscrews by hand, counterclockwise, once you get a good grip and break the crust of hard-water scale that’s glued it in place. The tricky part with Moen — unlike older no-name faucets — is that many of their modern pull-down and high-arc spouts use a hidden or recessed aerator that sits flush inside the spout tip, so there’s nothing sticking out to grab. That’s the piece most people get stuck on, and it’s exactly what this guide walks through.
An aerator is the little screen-and-housing insert at the very end of your faucet spout. It mixes air into the water so the stream feels full without wasting water, and it catches grit before it sprays all over your sink. When your Moen’s flow drops, splits into weird sideways sprays, or slows to a trickle, the aerator is the first and cheapest thing to check — long before you assume the cartridge or supply lines are failing.
Where Is the Aerator on a Moen Kitchen Faucet — and How Do I Know Which Type I Have?
On a Moen kitchen faucet, the aerator is inside the very tip of the spout where the water comes out — but Moen uses two main styles, and which one you have decides how you remove it. Look up into the end of the spout: if you see a small hex-shaped edge or a slotted plastic collar recessed inside, you have a hidden (cache) aerator that needs a key or a firm hand. If you see a threaded metal ring on the outside of the spout tip, you have a traditional external aerator.
Here’s how to tell them apart in ten seconds:
- Hidden / recessed aerator: The spout tip looks smooth and finished on the outside. The threads are on the inside. Moen ships a small plastic removal tool (often called an aerator key or cache wrench) with these — it’s the flat, star-shaped or slotted plastic piece in the parts bag most people throw away.
- External aerator: You can see a knurled or hex ring at the very end of the spout. This threads onto the outside of the spout and comes off with your fingers or a small wrench.
- Pull-down sprayer head: On many Moen pull-downs (Arbor, Sleek, Adler, Kaden), the aerator lives in the spray head itself and unthreads right where the head would spray into the sink.
If you’re not sure which model you own, check the underside of the spout or the original paperwork for a model number. Knowing your exact model also matters if you later need to chase down a different issue — a good starting point is our guide to the most reliable Moen kitchen faucet models, which lists the common series and how their spray heads and aerators are built.
How Do You Remove a Moen Kitchen Faucet Aerator by Hand?
For most Moen faucets you remove the aerator by hand: cover the spout tip with a dish cloth or rubber jar-opener for grip, then twist counterclockwise while looking straight up at the spout. “Counterclockwise” is from the perspective of standing under the faucet looking up — which feels backward from above, so if it isn’t budging, you may be turning it the wrong way.
Step by step, here’s the reliable method:
- Close the drain. Push the stopper down or lay a towel over the drain so you don’t lose the tiny rubber washer or the aerator screen down the pipe. This is the single most common way people turn a five-minute job into a trip to the store.
- Dry your hands and the spout. A wet, greasy grip slips. Dry everything first.
- Wrap the tip. Fold a cloth or paper towel around the spout end, or use a rubber jar gripper. This protects the finish (brushed nickel and matte black scratch easily) and multiplies your grip.
- Twist counterclockwise. Looking up from below, turn left. Firm, steady pressure — not a violent jerk. It should break free within a quarter turn if it isn’t scaled shut.
- Unthread the rest by hand and catch the whole assembly in your palm so nothing drops.
For a hidden Moen aerator, insert the plastic Moen key into the slots at the tip so its teeth seat into the recessed collar, then turn the key counterclockwise. No key on hand? A pair of needle-nose pliers gently spread into the slots can work, but go slow — it’s easy to crack the plastic housing or scar the spout.
How Do I Remove a Moen Aerator That’s Stuck From Hard-Water Buildup?
If your Moen aerator won’t turn, it’s almost always calcium and lime scale cementing the threads — and the fix is vinegar, not brute force. Soak the spout tip in warm white vinegar for 10–15 minutes to dissolve the mineral crust, then the aerator usually breaks free with normal hand pressure. Cranking harder before you soak is how spouts get scratched and plastic keys snap.
The easiest way to soak a spout you can’t remove is the “bag trick”:
- Fill a small sandwich bag about a third full with warm (not boiling) white vinegar.
- Raise the bag so the entire spout tip is submerged in the vinegar.
- Secure it with a rubber band around the spout and let it sit 10–15 minutes (up to 30 for heavy scale).
- Remove the bag, wipe the tip, and try twisting counterclockwise again with a cloth for grip.
Still stuck after soaking? Wrap the spout tip in cloth and use slip-joint pliers or a strap wrench for a bit more leverage — but only a bit. The cloth is non-negotiable; bare pliers will chew up the finish instantly. If the plastic collar of a hidden aerator has crumbled and there’s nothing left to grip, the cleanest path is to buy a replacement aerator for a few dollars and pick out the old pieces, rather than destroying the spout trying to save a worn-out part.
Hard water is the root cause here, and if your aerator clogs every few months it’s a sign your whole home water is loading up minerals. Plenty of readers solve it upstream — our rundown on finding a faucet water filter and which one to actually buy covers the point-of-use options that keep scale out of the aerator in the first place.
Moen Aerator Removal Methods Compared: Which One Should You Try First?
Not every stuck aerator needs the same tool. Here’s how the common methods stack up, from gentlest to most aggressive, so you escalate only as far as you need to.
| Method | Best For | Effort / Risk | What You Need |
|---|---|---|---|
| Bare hand, counterclockwise | Recently installed or lightly used faucets | Lowest — no risk to finish | Nothing |
| Cloth or rubber jar gripper | Slightly tight aerators, protecting finish | Low — safe for brushed/matte finishes | Dish cloth or jar opener |
| Moen plastic aerator key | Hidden / recessed Moen aerators | Low — the correct factory tool | Key from original box (or replacement) |
| Vinegar soak (bag trick) | Hard-water scale, mineral lock | Low — just needs 10–30 min | White vinegar, bag, rubber band |
| Cloth-wrapped pliers / strap wrench | Truly seized external aerators | Higher — can scratch if cloth slips | Slip-joint pliers or strap wrench + cloth |
The rule of thumb: never skip straight to pliers. Nine out of ten stuck Moen aerators come loose after a cloth-grip attempt plus a vinegar soak, and those two cost you nothing and risk nothing.
How Do I Clean and Reinstall the Aerator Once It’s Out?
Once the aerator is out, disassemble it, rinse the screen, soak the parts in vinegar to clear scale, and reassemble in the same order — then thread it back on hand-tight only, no tools. The whole point of removing it is usually to restore flow, so cleaning is where you actually get your water pressure back.
Lay the pieces out in the order they came apart — typically an outer housing, a rubber washer/O-ring, a plastic flow restrictor, and one or two metal screens. Then:
- Rinse everything under a strong stream to flush loose grit backward out of the screen.
- Soak the metal and plastic parts in white vinegar for 10–15 minutes to dissolve stubborn scale.
- Use an old toothbrush to scrub the screen and housing threads clean.
- Check the rubber washer — if it’s cracked, flattened, or brittle, replace it. A worn washer causes drips right at the spout tip.
- Reassemble in the exact reverse order and thread it back onto the spout by hand only. Overtightening cracks the housing and makes next time miserable. If it seeps, add half a turn or wrap the threads with a single layer of plumber’s tape.
Turn the water on and check the stream. If it’s full and straight, you’re done. If the flow is still weak after a clean aerator, the problem is deeper in the faucet — usually the cartridge or a clogged supply line — and that’s a different repair. We walk through exactly that in our guide to fixing a Moen kitchen faucet with low water pressure, including whether you can do it yourself.
Do I Need to Turn Off the Water to Remove a Moen Aerator?
No — you do not need to shut off the water to remove a Moen kitchen faucet aerator, because you’re only working on the very tip of the spout, downstream of every valve. Just make sure the faucet handle is in the off position so water doesn’t run while you work, and close the drain. This is one of the few faucet jobs where you can skip the shut-off entirely.
That said, shutting off the supply valves under the sink does no harm and gives peace of mind if you’re nervous or your handle drips. If you do plan to keep going deeper into the faucet — say, pulling the cartridge — then yes, turn off the two supply stops under the sink first. For a simple aerator swap, though, closing the drain matters far more than the water supply.
What If the Aerator Is Broken or Missing — Which Replacement Fits My Moen?
If the aerator threads are stripped, the plastic collar has crumbled, or the part is simply gone, buy a Moen-compatible replacement aerator sized to your spout — Moen kitchen faucets commonly use a hidden 15/16-inch or 55/64-inch thread, but the safest move is to match by model number or bring the old part to the store. A universal “dual-thread” aerator from the hardware store fits many external-thread Moen spouts and costs only a few dollars.
A few buying tips so you get the right one the first time:
- Match male vs. female threads. Hidden Moen aerators thread inside the spout (male threads on the aerator). External ones thread outside. Get this backward and nothing lines up.
- Match the flow rate (GPM). Kitchen aerators are usually 1.5–2.2 GPM. A lower number saves water but feels gentler; keep the same rating your faucet shipped with unless you want to change the feel.
- Consider a Moen genuine part if you have a hidden aerator, since the recessed key-fit design is Moen-specific and a generic won’t always seat.
Aerators are just one of the cheap wear parts that keep a faucet running smoothly; if you’re the type who likes to keep a small kit of spares on hand, our overview of essential brass faucet parts worth buying covers the washers, O-rings, and screens that fail most often.
FAQ
Which way do you turn a Moen aerator to remove it?
Counterclockwise — but from the perspective of looking straight up at the spout from underneath. Because you’re viewing it from below, the direction feels reversed compared to loosening a normal screw from above. If it won’t turn one way, it’s not necessarily stuck; you may simply be turning it the wrong direction.
Why is my Moen aerator so hard to unscrew?
Almost always hard-water scale. Calcium and lime deposits build up in the threads over months and effectively cement the aerator to the spout. Soak the spout tip in warm white vinegar for 10–15 minutes to dissolve the buildup, then it usually comes loose by hand. Forcing it before soaking risks scratching the finish or snapping the plastic housing.
Do all Moen kitchen faucets have a removable aerator?
Yes. Every Moen kitchen faucet has a serviceable aerator, but the location and removal method vary. Standard spouts use an aerator at the spout tip (hidden or external), while pull-down and pull-out models house the aerator inside the spray head. All of them are designed to be unthreaded and cleaned or replaced.
What tool removes a hidden Moen aerator?
The small plastic Moen aerator key (also called a cache wrench) that ships in the box. Its teeth seat into the slotted collar recessed inside the spout, and you turn it counterclockwise. If you lost the key, replacements are inexpensive, and in a pinch gently spread needle-nose pliers can grip the slots — but go slowly to avoid cracking the plastic.
How often should I clean my faucet aerator?
Every three to six months in hard-water areas, or any time you notice the stream weakening, spraying sideways, or splitting. If yours clogs faster than that, your home has heavy mineral content and you’d benefit from filtering or softening the water upstream so scale never reaches the aerator in the first place.
Can a clogged aerator damage my faucet?
Not the aerator itself, but ignoring it can. A clogged aerator forces you to run the handle harder and can mask a failing cartridge. It also means grit is collecting where it can eventually work into the valve. Cleaning the aerator regularly is the cheapest preventive maintenance a faucet gets.
About the author: This guide was written by the Avamani fixtures team, drawing on hands-on installation and repair of hundreds of kitchen and bathroom faucets across major brands, including Moen’s Arbor, Adler, Sleek, and Kaden series. We test removal and cleaning methods on real faucets before we recommend them.
Why trust Avamani: Avamani (avamani.com) specializes in faucets and bathroom fixtures, and our product and how-to content is reviewed against manufacturer service documentation and industry standards. Aerator flow rates referenced here follow the U.S. EPA WaterSense and standard 2.2 GPM kitchen benchmarks, and we always recommend checking your specific model’s warranty before replacing parts — Moen’s finish and function warranties can be affected by using non-genuine components, so match parts to your model when in doubt.