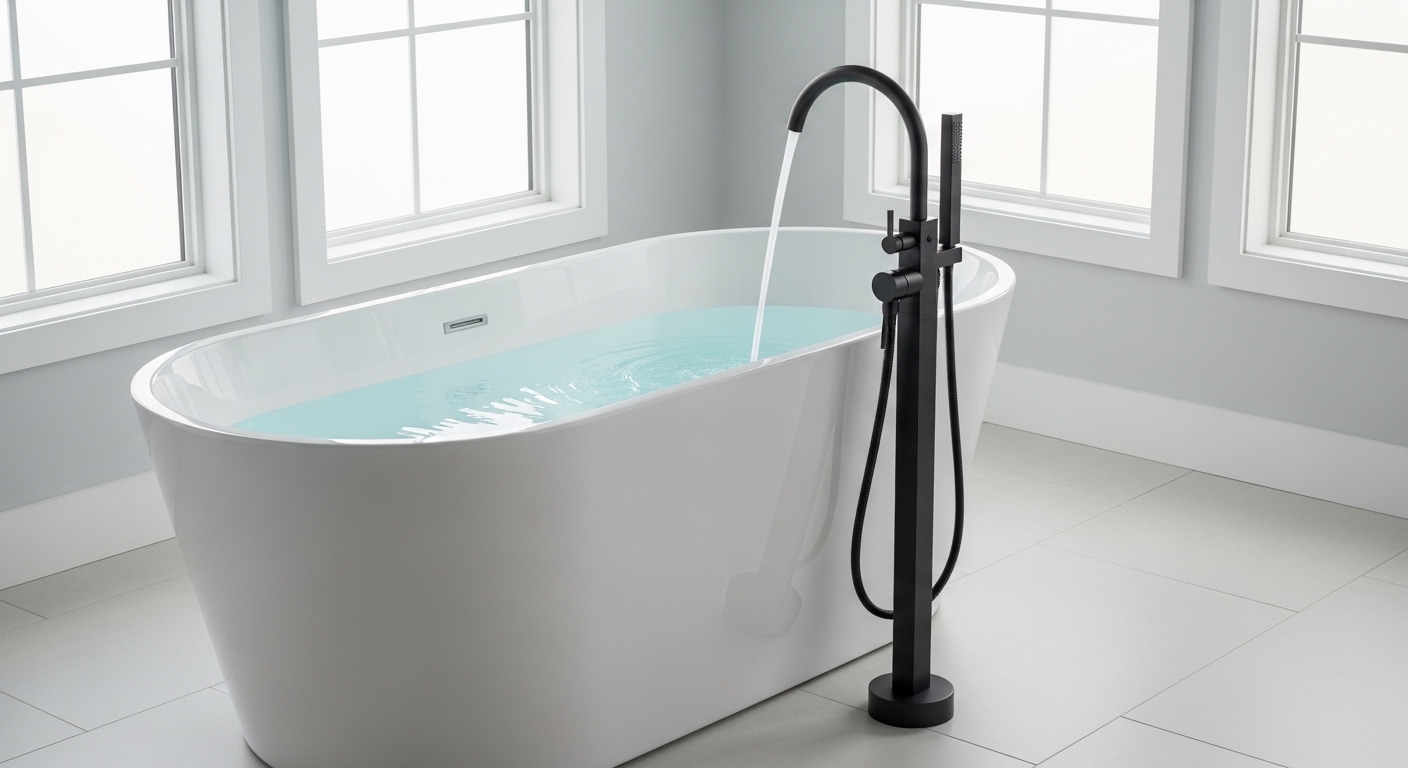
If you’ve fallen in love with a freestanding soaking tub but realized there’s nowhere to rinse the shampoo out of your hair, a freestanding tub shower faucet combo is the fixture that solves it. It’s a tall, floor-mounted faucet — the plumbing runs up through the floor, not the wall — that combines a high-arc tub spout with a pull-out handheld shower wand, controlled by a diverter so water flows either from the spout to fill the tub or up to the handheld to rinse. It gives a stand-alone tub the practicality of a shower without the cost of building a separate shower enclosure.
Below, I’ll walk you through exactly what these do, who they’re for, how to size and buy one, what they cost, and the installation gotchas that trip people up — in plain language, with real numbers.
What exactly is a freestanding tub shower faucet combo, and how is it different from a regular tub filler?
A freestanding tub shower faucet combo is a floor-mounted tub filler that adds a handheld shower — a plain tub filler only fills the tub, while the combo lets you switch between filling and showering with a diverter. That handheld wand is the whole point: it turns a bathing-only tub into a place you can actually wash your hair, rinse the kids, or hose down the tub after cleaning.
Mechanically, here’s what’s going on. Water comes up from the floor through a rough-in valve (the part buried under the finished floor) into a tall riser. At the top you get the spout that arcs over the tub rim, one or two handles for hot/cold, and a diverter — a small knob or lever that redirects flow from the spout up a flexible hose to the handheld sprayer. Pull the diverter and the spout stops, the handheld starts.
Compare that to the fixtures you might otherwise consider:
- Plain freestanding tub filler: Fill only, no handheld. Cheaper, cleaner look, but you can’t rinse.
- Deck-mounted tub filler: Mounts on a wide tub rim or deck instead of the floor — only works if your tub has a mounting surface.
- Wall-mounted tub/shower valve: The traditional setup where the tub sits against a wall with a showerhead above. Great when your tub is against a wall, useless for a tub in the middle of the room.
- Freestanding tub shower faucet combo: Floor-mounted, self-supporting, fill + handheld in one. The answer when the tub is away from any wall.
Do you actually need one, or is a plain tub filler enough?
You need the combo if your freestanding tub is your only bathing fixture in that room, or if anyone in the household needs to rinse off, wash hair, or bathe kids and pets — otherwise a plain filler is fine. The handheld is not a luxury for most families; it’s the difference between a tub you soak in occasionally and one you use every day.
Ask yourself these questions:
- Is there a separate shower in the same bathroom? If yes, you can get away with a plain filler and shower elsewhere. If no, get the combo.
- Do you have long hair, kids, or pets? Rinsing shampoo or a muddy dog in a tub with no handheld is genuinely miserable. Combo.
- How do you clean the tub? A handheld makes rinsing cleaning product out of the tub effortless. Small thing, big daily quality-of-life boost.
- Resale? A stand-alone tub with a handheld reads as more functional to buyers than a fill-only tub.
The one case where you skip it: you have a spa-style bathroom with a separate walk-in shower, the tub is purely for soaking, and you want the cleanest possible minimalist silhouette. Then a plain filler wins on looks.
How do you choose the right one for your bathroom and budget?
Choose based on four things in this order: solid-brass construction, valve/rough-in compatibility, water pressure and flow rate, and finish — construction and valve matter far more than looks. A gorgeous faucet on a cheap zinc body will pit and wobble within a couple of years; get the bones right first.
What material should the faucet body be?
Buy solid brass, not zinc alloy or plastic. Brass resists corrosion, holds threads under the weight of a tall riser, and won’t crack from the constant pressure cycling. Reputable listings say “solid brass” outright; if the spec sheet is vague or the price seems too good, it’s usually zinc. A freestanding filler is heavy and stands unsupported — you do not want a weak body here.
What water pressure do you need, and will it fill fast?
You want at least 40–60 PSI of home water pressure for a freestanding filler, because the water travels a long vertical path and these spouts move a lot of water. Look for a flow rate around 5–7 GPM (gallons per minute) on the tub spout so a big soaker actually fills in a reasonable time — a 60-gallon tub at 6 GPM fills in about 10 minutes. The handheld will typically be capped near 1.8–2.5 GPM to meet water-efficiency standards. If your home pressure is under 40 PSI, a tall filler may dribble; check before you buy.
Which finish holds up best?
Here’s an honest finish comparison based on how they wear in real bathrooms:
| Finish | Look | Shows water spots / fingerprints | Durability | Best for |
|---|---|---|---|---|
| Chrome | Bright, classic | Yes, a lot | Very high, easy to clean | Budget builds, traditional baths |
| Brushed / Satin Nickel | Warm silver, soft sheen | Minimal — hides spots well | High | Everyday family bathrooms |
| Matte Black | Bold, modern | Hides spots, shows dried mineral film | High if quality PVD coat | Contemporary, statement tubs |
| Brushed Gold / Champagne Bronze | Warm, luxe | Low | High with PVD | Spa-style, warm palettes |
| Oil-Rubbed Bronze | Dark, traditional | Low | High, living finish that patinas | Farmhouse, vintage, classic |
Whatever finish you pick, insist on a PVD (physical vapor deposition) coating rather than a sprayed/electroplated topcoat — PVD is bonded at a molecular level and resists scratching and fading far better. If you’re drawn to a darker, warmer look, our deep dive on the oil rubbed bronze bathtub faucet covers exactly how that living finish ages. And if you’re still deciding the overall style direction for the whole room, it’s worth browsing the best bathroom faucet collections so your tub filler, vanity faucet, and shower trim actually match.
How do you install a freestanding tub shower faucet combo — and can you DIY it?
Most people should not fully DIY this one; a floor-mounted filler needs an in-floor rough-in valve set before the finished floor goes down, which usually means a plumber during construction or a bathroom remodel. The visible faucet is easy to attach at the end, but the buried plumbing is unforgiving to get wrong after the floor is finished.
Here’s the honest sequence:
- Rough-in stage (plumber territory): The rough-in valve and supply lines are installed and positioned before the subfloor and finished floor are laid. Location is measured precisely against where the tub will sit — usually near the tub’s drain end.
- Set the floor and tub: Finished flooring goes down around the rough-in; the tub is set in its final position.
- Mount the faucet: The freestanding riser bolts to the floor flange over the rough-in valve. This part — connecting the riser, tightening the base, attaching the handheld hose — is genuinely DIY-friendly if the rough-in is already there.
- Test: Run the spout, work the diverter, check the handheld, and inspect every connection for leaks before you call it done.
Two things that catch people out: buy the rough-in valve made for your specific faucet (they’re often sold separately, and mixing brands causes leaks), and confirm your floor construction can support a floor-mounted fixture — a slab foundation makes running new supply lines much harder than a joisted floor with a crawlspace or basement below. If you’re comfortable connecting a handheld and want a feel for how simple the sprayer side is, our walkthrough on how to install a shower head yourself shows the same hose-and-fitting principles.
What does a good one cost, and where does the money go?
Expect $300–$900 for a quality solid-brass freestanding tub shower faucet combo, plus $60–$150 for the matching rough-in valve, plus $150–$400 in plumber labor if the rough-in isn’t already there. Fixtures under about $200 are almost always zinc-bodied and worth skipping for a load-bearing fixture like this.
Here’s roughly what each tier gets you:
| Price tier | What you get | Watch out for |
|---|---|---|
| Under $200 | Zinc or thin brass, basic diverter, limited finish options | Wobble, finish flaking, weak flow — usually false economy |
| $300–$500 | Solid brass body, PVD finish, ceramic-disc cartridge, decent handheld | The sweet spot for most homes — confirm the valve is included or matched |
| $600–$900 | Heavier brass, premium finishes, smoother diverter, better warranty | Paying partly for brand and finish; verify the flow rate still suits your tub |
| $1,000+ | Designer/luxury brands, thermostatic options, statement design | Diminishing returns on function; mostly aesthetics and name |
The single biggest hidden cost is labor if you’re retrofitting a filler into an existing bathroom that never had one — running new supply lines through a finished floor can rival or exceed the faucet price. That’s why the combo is easiest and cheapest to spec during a remodel, when the floor is already open.
What goes wrong with these faucets, and how do you avoid it?
The most common problems are a weak dribble from low water pressure, a diverter that won’t hold, and leaks at the floor connection — nearly all of which come from a cheap body, a mismatched rough-in valve, or skipped pressure testing. Buy solid brass, use the matched valve, and confirm your PSI, and you’ve dodged 90% of the headaches.
A few specifics from real-world service calls:
- Sticky or failing diverter: Usually a cheap plastic mechanism or mineral buildup. Ceramic-disc and quality diverters last far longer; hard water shortens the life of all of them.
- Drips and internal leaks: A dripping tub filler or valve is almost always a worn cartridge or seal, not the whole fixture. If yours starts leaking down the line, our guide to a leaking shower faucet valve walks through diagnosing and replacing the right internal part instead of tearing out the faucet.
- Wobble at the base: Either the floor flange wasn’t anchored to solid framing or the body is too light. Solid brass on a properly anchored flange stays rock-steady.
- Handheld hose kinking or leaking: Look for a braided stainless hose and a metal wand rather than plastic.
A quick note on quality, standards, and who’s writing this
This guide was written and reviewed by the Avamani fixtures team, who spec, pressure-test, and sell tub and shower fixtures full-time. We’ve been shipping bathroom and kitchen faucets direct to homeowners for years, and every freestanding filler we recommend is solid brass with a PVD finish and a ceramic-disc cartridge.
When you shop — with us or anyone — look for fixtures that are certified to the recognized North American plumbing standards (cUPC / NSF-approved for lead-free waterways under NSF/ANSI 372) and backed by a real warranty. Avamani’s freestanding fillers carry a limited lifetime warranty on the finish and function of the faucet body, because we’ve tested how they hold up over thousands of open-close cycles. Certification and warranty aren’t marketing fluff here; they’re your proof the waterway is lead-safe and the finish won’t peel.
FAQ
Can I add a freestanding tub shower faucet combo to a tub I already have?
Yes, if the floor plumbing can be reached and a rough-in valve added — but it’s much easier during a remodel when the floor is open. Retrofitting into a finished bathroom usually means opening the floor or ceiling below to run supply lines, which is the expensive part. Have a plumber confirm access before you buy.
Does a freestanding tub filler have enough pressure to work as a real shower?
The handheld gives a solid rinse but isn’t a substitute for a full overhead shower. It’s designed to be capped near 1.8–2.5 GPM for water efficiency, so it’s perfect for washing hair, rinsing kids, and cleaning the tub — but if you want a daily standing shower experience, plan a separate shower or a wall-mounted showerhead.
How far from the wall does a freestanding tub filler go?
It’s floor-mounted right beside the tub — typically a few inches from the tub’s edge at the drain end, wherever the rough-in was set. Because it’s self-supporting from the floor, it doesn’t need a wall at all, which is the whole reason it works for tubs in the middle of a room.
Do I need a special rough-in valve, and is it included?
Yes, you need an in-floor rough-in valve, and it’s often sold separately. Always buy the rough-in made or specified for your exact faucet — mixing brands is a leading cause of leaks. Check the listing carefully; budget an extra $60–$150 if it’s not bundled.
What finish is easiest to keep clean on a freestanding filler?
Brushed/satin nickel and brushed gold hide water spots and fingerprints best, so they look clean with the least effort. Chrome is the easiest to physically wipe down but shows every spot; matte black looks great but reveals dried mineral film in hard-water areas. In all cases, wipe with a soft damp cloth — never abrasive cleaners — to protect the PVD coating.
How long should a good one last?
A solid-brass filler with a ceramic-disc cartridge and PVD finish should last 15–20+ years, with only the cartridge or handheld hose likely needing replacement along the way. Cheap zinc units often show finish failure and wobble within 2–4 years — which is exactly why construction matters more than looks.