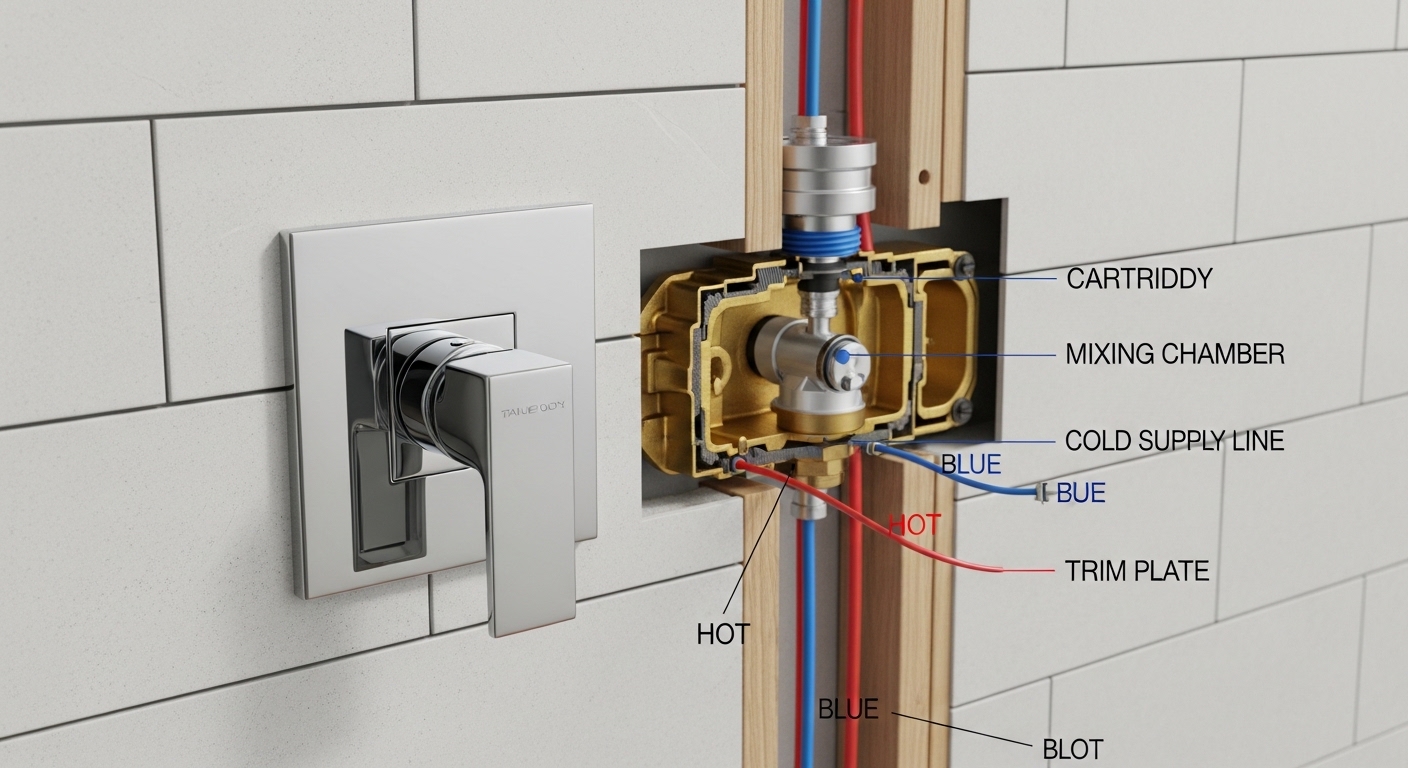
A shower valve system replacement means swapping the working guts behind your shower wall — the valve body, cartridge, and the trim (handle, escutcheon, and shower head) — because the old one leaks, won’t hold temperature, or drips constantly no matter how hard you crank the handle. It’s one of the most common bathroom repairs homeowners face, and the good news is that a lot of it is genuinely DIY-able if you know which type of valve you have and how far into the wall the job actually goes.
Below, we’ll walk through exactly what a shower valve system is, when you can get away with a quick cartridge swap versus a full valve-body replacement, what it costs, and how to pick the right valve so you’re not doing this again in three years. We install and test faucet hardware for a living, so this is the practical version — real terminology, real numbers, no fluff.
What exactly is a “shower valve system” — and what’s actually failing?
A shower valve system is the mixing valve behind your wall plus everything attached to it: the brass or bronze valve body soldered or push-fit to your hot and cold supply lines, the replaceable cartridge inside it that blends the water, and the visible trim kit (handle, escutcheon plate, tub spout, and shower head). When people say their shower “needs a new valve,” 80% of the time the real culprit is a worn cartridge — a $20–$60 part — not the whole valve body.
Here’s how to tell what’s failing:
- Dripping from the shower head when off: almost always a worn cartridge or seat/spring. Cheap fix.
- Handle spins loosely or won’t shut off: stripped cartridge stem. Cartridge swap.
- Water temperature swings when a toilet flushes: your valve has no pressure balancing — that’s a reason to upgrade the whole system.
- Leaking behind the wall (stains on the ceiling below): failed valve body, cracked solder joint, or corroded threads. This is the real full-system replacement.
- Rust-colored water or you can’t find any matching cartridge: the valve body is obsolete — replace it.
If it’s just a drip, start with our guide on a shower faucet valve that’s leaking before you tear open a wall — you may save yourself hours. But if the valve body itself is compromised, keep reading.
Can you do a shower valve system replacement yourself, or do you need a plumber?
You can absolutely DIY a shower valve system replacement if you’re replacing a cartridge or trim, or if your existing valve uses push-to-connect (SharkBite-style) fittings. You’ll want a plumber if the job requires soldering copper in a tight wall cavity, if the valve is buried behind solid tile with no access panel, or if you’re moving from a standard valve to a thermostatic system that changes the plumbing layout.
Honestly, the deciding factor isn’t the valve — it’s the wall. A shower valve on the back of a closet with a drywall access panel is a Saturday-morning job. A valve behind a tiled shower surround with no access is a different animal: you’re either cutting tile from the front or drywall from the adjoining room, and that’s where a lot of DIYers decide the plumber’s fee is worth it.
Two skill checkpoints before you commit:
- Can you shut off water to the shower? Some homes have shower stops behind the trim plate; most require shutting the main. Test it first.
- Can you sweat copper, or will you use push-fit? Push-to-connect fittings and PEX have made this a no-solder job for most people. If you’re comfortable with a torch, copper is cheaper and permanent.
If you’ve handled other plumbing jobs — say you’ve already learned how to fix a leaky faucet while the shower is on — you’ve got the temperament for this. It’s methodical, not hard.
What does a shower valve system replacement cost in 2026?
Expect $150–$400 in parts for a DIY shower valve system replacement, or $350–$900 total if a plumber does the labor. The single biggest cost driver isn’t the valve — it’s whether the wall has to be opened and re-tiled afterward, which can add $200–$600 on its own.
| Scope of job | Parts cost | Pro labor | Time |
|---|---|---|---|
| Cartridge only (same valve body) | $20–$60 | $120–$200 | 30–60 min |
| Trim kit swap (handle + escutcheon + head) | $80–$250 | $150–$250 | 1 hr |
| Full valve body — push-fit, with access panel | $150–$350 | $300–$500 | 2–3 hrs |
| Full valve body — soldered, tile removal needed | $200–$400 | $500–$900+ | 3–5 hrs + tile repair |
| Upgrade to thermostatic system | $300–$700 | $500–$1,000 | 4–6 hrs |
A few things worth knowing before you budget: valve trim and valve body are often sold separately, and a premium trim finish (matte black, brushed gold) can double the trim price alone. Also, if your valve is more than 15 years old, buy the matching trim at the same time — mixing a new body with old trim rarely lines up.
What type of shower valve should you actually buy — pressure-balance vs. thermostatic?
For most homes, buy a pressure-balancing valve — it’s code-required in most of the U.S., prevents scalding when someone flushes a toilet, and costs far less than thermostatic. Choose a thermostatic valve only if you want to set an exact temperature, run multiple outlets (rain head plus body sprays), or you have someone in the house who’s very temperature-sensitive.
| Feature | Pressure-balance | Thermostatic |
|---|---|---|
| What it controls | Balances hot/cold pressure | Locks in exact temperature |
| Anti-scald protection | Yes | Yes (more precise) |
| Runs multiple outlets | Usually one at a time | Yes, several at once |
| Typical valve cost | $60–$180 | $200–$500 |
| Best for | Standard single showers | Spa showers, families, custom systems |
One caution people miss: match your valve to your water pressure and flow. If you’re on a well or low-pressure municipal supply, a big thermostatic system feeding a rain head and three body jets will feel weak. Size the system to the water you actually have. And if you’re building a bathtub-plus-shower setup from scratch, our guide on a freestanding tub shower faucet combo covers how the valve requirements change.
How do you replace a shower valve system step by step?
Here’s the full DIY sequence for a shower valve system replacement using an access panel and push-to-connect fittings — the most common no-solder path. Give yourself half a day the first time.
- Shut off the water — main supply or shower stops. Open the shower handle to drain residual water.
- Remove the trim — handle, escutcheon, and any tub spout. Set screws are often hidden under a cap.
- Open the wall — through the access panel, or cut a clean rectangle in the adjoining drywall so you can patch it easily.
- Cut out the old valve body — with a pipe cutter, leaving as much clean copper stub as possible on the hot, cold, riser, and spout lines.
- Deburr and mark depth — clean every pipe end; push-fit needs a burr-free, marked insertion depth or it can leak.
- Dry-fit the new valve body — orient it with “hot” on the correct side and the correct plaster-guard depth for your finished wall thickness. This is the #1 mistake — set it too deep or too shallow and the trim won’t seat.
- Connect the lines — push-to-connect the hot, cold, shower riser, and tub spout ports.
- Pressure-test — turn water back on with the plaster guard still on, run the shower, and check every joint and the wall cavity for drips. Leave it running 5 minutes.
- Close the wall, install trim — remove the plaster guard, seat the escutcheon with a bead of silicone at the top and sides (leave the bottom open so any leak can escape), and mount the handle.
- Set the anti-scald limit stop — adjust the rotational limit so the hottest setting can’t scald. Skipping this is a safety miss.
While the wall is open, it’s the perfect time to upgrade the shower head too. If you haven’t done that part before, installing a new shower head is genuinely a 20-minute job and worth doing at the same time.
How long does a replacement shower valve last, and how do you make it last longer?
A quality brass-bodied shower valve lasts 20–30 years; the cartridge inside it is the wear part and typically needs replacing every 5–10 years, sooner in hard water. The valve body almost never fails on its own — it’s mineral buildup and worn cartridge seals that cause 90% of problems.
To stretch the life of your new system:
- Fight hard water. Calcium is the enemy of cartridges. If you’ve got hard water, a whole-house softener pays for itself in fixture lifespan.
- Buy a valve with a widely stocked cartridge. The best valve in the world is useless if you can’t find the cartridge in 2036. Stick with major-standard cartridge platforms.
- Don’t over-tighten the handle. Cranking a stiff handle grinds the cartridge stem faster.
- Exercise the anti-scald stop. Run it through its full range occasionally so it doesn’t seize.
When you do buy, look for a valve certified to ASME A112.18.1 / CSA B125.1 and, for anti-scald, ASSE 1016 — those are the U.S./Canada standards that confirm the valve was tested for pressure balancing and safe temperature limits. A lifetime limited warranty on the valve body (with a shorter finish warranty) is the norm from reputable brands; if the warranty is only a year or two, that tells you something.
FAQ
Do I have to replace the whole shower valve, or just the cartridge?
Just the cartridge, in most cases. If your valve body isn’t cracked or leaking behind the wall and you can find a matching cartridge, a $20–$60 cartridge swap fixes dripping, temperature swings, and loose handles. Replace the whole valve body only if it’s corroded, cracked, obsolete, or you’re upgrading to pressure-balance or thermostatic.
Can I replace a shower valve without opening the wall?
You can replace the cartridge and trim without opening the wall — those come out from the front. But replacing the actual valve body almost always requires wall access, either through an existing panel or by cutting drywall from the adjoining room. There’s no reliable way to swap a soldered valve body purely from the shower side without removing tile.
Does a new shower valve need to match my existing brand’s trim?
Yes — valve bodies and trim kits are brand- and often series-specific. A trim kit is designed to fit a particular valve body’s stem and mounting depth, so you generally can’t mix Brand A’s trim onto Brand B’s valve. When you replace the valve body, plan to buy the matching trim from the same line at the same time.
Is a thermostatic shower valve worth the extra cost?
It’s worth it if you want to dial in an exact temperature every time, run a rain head plus body sprays simultaneously, or protect kids and older adults from temperature swings. For a standard single-head shower, a pressure-balancing valve gives you anti-scald safety at a third of the cost, so most homeowners don’t need thermostatic.
How do I know what size shower valve to buy?
Match the inlet connection size and type to your existing supply lines — most residential showers use 1/2-inch copper, PEX, or IPS threaded connections. Also confirm the number of ports (some valves add a tub-spout diverter port) and the wall thickness the valve is rated for, so the trim seats flush. When in doubt, take a photo of the old valve and its connections to the store.
Will a shower valve replacement stop my drip permanently?
If the drip was caused by a worn cartridge or seat, yes — a new cartridge or valve stops it permanently. If the drip persists after replacement, the usual causes are debris in the new cartridge, an incorrectly seated valve, or a supply-side issue. In hard-water homes, plan to replace the cartridge again in 5–10 years to keep it drip-free.
About the author: This guide was written by the Avamani fixtures team, who install, bench-test, and pressure-test shower valves and cartridges as part of our product QC. We’ve replaced valves across pressure-balance, thermostatic, and legacy compression systems, and everything here reflects hands-on installs — not spec-sheet theory.
About Avamani: Avamani (avamani.com) is a specialist in faucets, shower systems, and bathroom fixtures. Every shower valve we recommend is evaluated against ASME A112.18.1 and ASSE 1016 anti-scald standards, backed by a manufacturer warranty, and chosen for cartridge availability so you can service it for decades — not just the first year.